
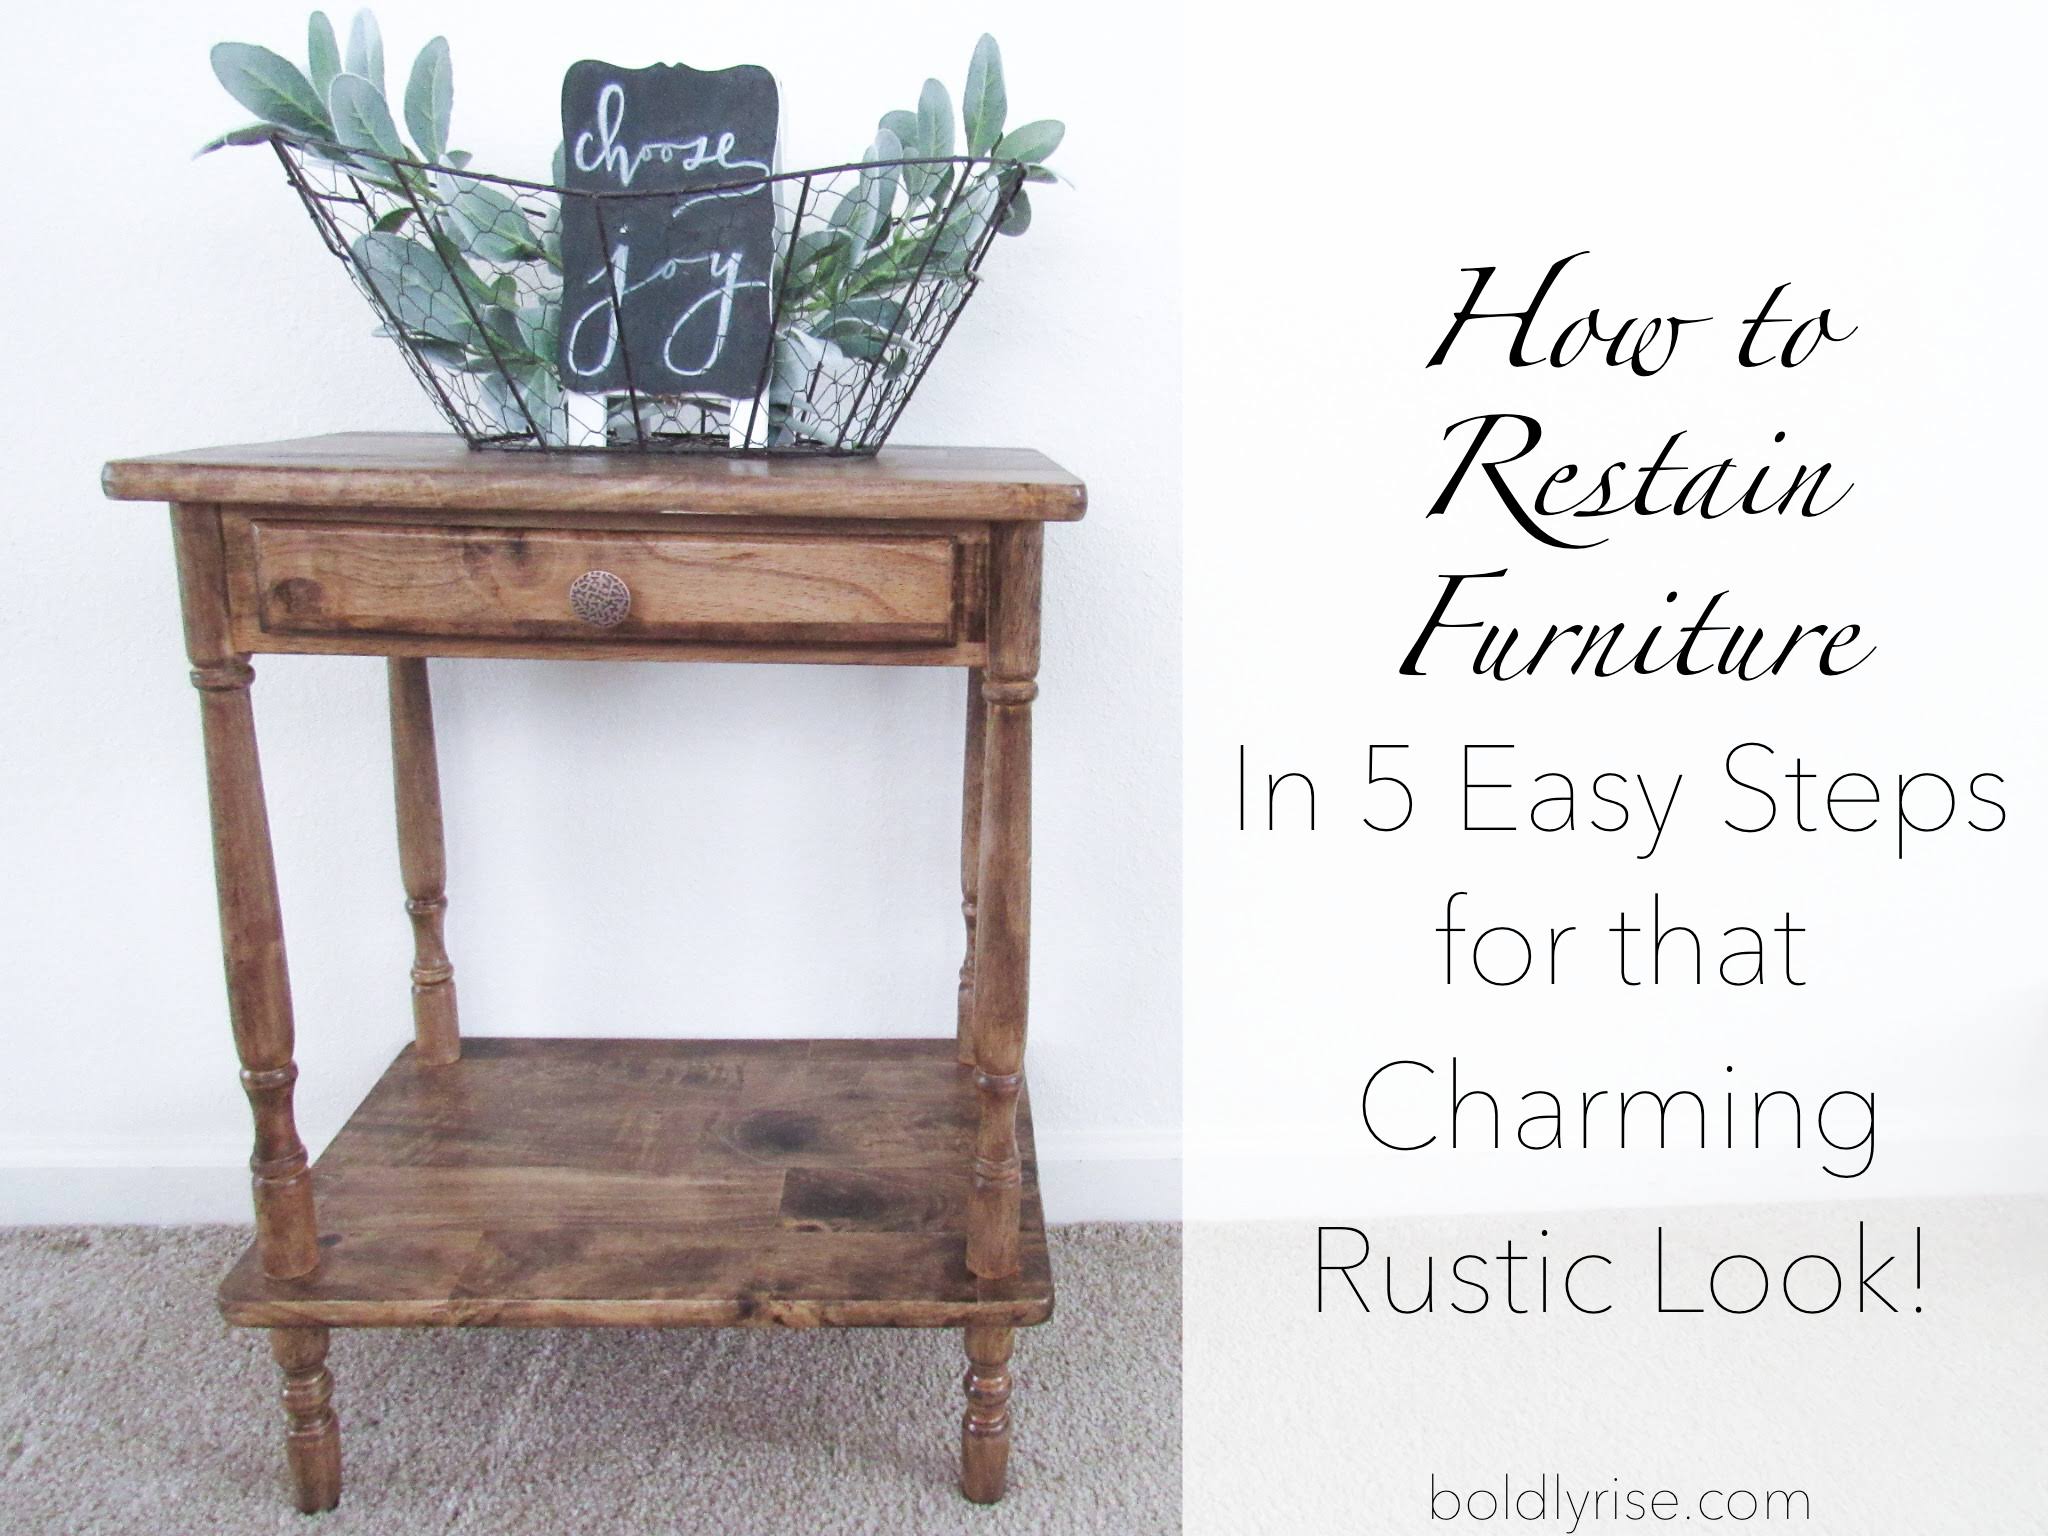
Have you ever just not done something because you don’t have any idea where to start? I have so been there on multiple different occasions. In this particular instance of restaining wooden furniture, I’ve definitely thought that it would be easier to ditch the piece of furniture and go buy a new one. But at the same time…I like saving money where I can. So my husband and I did a little research and started making and restaining our own furniture! Friends, it really is a lot easier than you might think. So I wanted to give you a quick guide on how to restain your furniture in 5 easy steps.
In addition, I want to show you how restaining a piece of furniture you may not find joy in relates to being a Proverbs 31 woman.
Before I jump into the list, I do want to point out that restoring your wooden furniture will take time. Notice how it’s not 5 “quick” and easy steps. It’s largely due to the amount of time needed to dry. But on the bright side, the time you physically spend on it is not all that long.
So here we go!
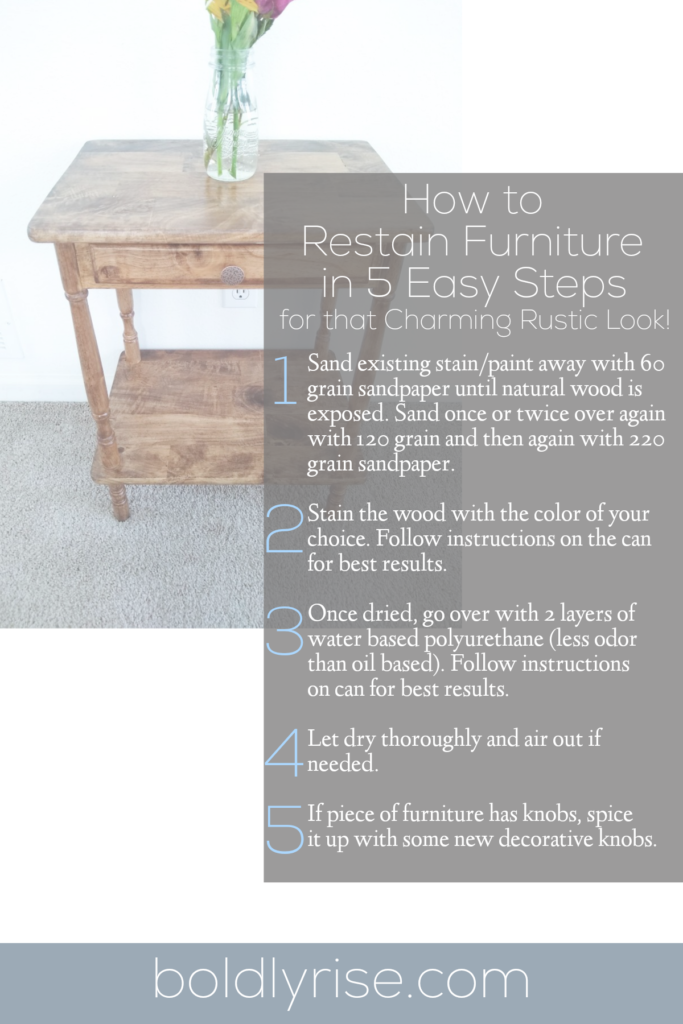
1) Sand existing stain/paint away with 60 grain sandpaper until natural wood is exposed. Sand once or twice over again with 120 grain and then again with 220 grain sandpaper.
Learning how to restain furniture means being diligent with each step. This step of sanding is where you’ll spend most of your time. Sanding it down is important for two reasons. First, it removes the layers you definitely want to get rid of. Second, it smooths down the wood and creates a surface for the stain to grip on.
Using 60 grain sandpaper, sand all the stained/painted layers down until only the natural wood is showing. Using the 60 grain sandpaper will take more time than using the other two. This is largely due to the fact that you’re sanding away multiple layers down rather just giving it a quick once over.
After it’s all sanded down, use 120 grain to smooth it down further. It just needs a good once over. If you feel it needs another round of 120 grain, go ahead and sand it once more. And finally, sand all surfaces down with 220 grain. This allows the wood to fully soak in the stain or paint. Again, you don’t need to spend much time on this, a good once over is all you need with the 120 and 220.
2) Stain the wood with the color of your choice.
I personally like darker stain better. The color I used in the picture is called “Special Walnut” (one of my fav’s!). I love how to dark stain still keeps the woods’ natural look, but also really brings out the woods characteristics (lines, grains, knots, etc.).
I like to use a normal bristle brush for the stain. After 5-15 minutes from applying the stain, take either a cloth (that you don’t mind getting dirty) or paper towels and wipe the excess off. The longer you wait, the deeper the color. As I was learning how to restain furniture, I found out that using paper towel is far better than using a cloth. I don’t recommend using a cloth because one, they’re more expensive, and two, there’s always the instinct to wash them. Trust me, it’s better not to deal with it. It will stink up your entire house if you wash it (I know because I’ve tried…). This is why I use paper towels, because I can throw it away when it’s done. I don’t have to worry about the smell in the house or getting the stain on something I don’t want it on.
If you want to put a second coat on, wait about 3-4 hours. I typically just do one coat. I like vividly seeing the natural lines, knots, and grain of the wood (the nightstand in the main picture has only one coat on it).
3) Once dried, apply water based polyurethane.
If you don’t want to do this step, it’s not absolutely necessary. Polyurethane helps to protect the stain, keeps it from wearing off sooner, and adds a shiny look to it.
But usually, unless there’s going to be a lot of wear and tear on the furniture (like if it’s a dinner table or a nightstand) you’ll definitely want to use polyurethane.
You can use whatever kind of polyurethane you want, but friends, if you want low odor, I’d go with water based poly. I’ve used oil based poly in the past, and even after 2-3 days of drying and airing it out, I can’t bring it in the house because the smell is still that potent… so water based is the way to go! It’s not as protective as oil based, but it shouldn’t matter unless the furniture is going to stay outside (if that’s the case, then you’ll want to use oil based).
I like to use a different brush for polyurethane. I use a little sponge brush (they’re usually black). I also do 2 coats of it. The first layer can be a little bumpy if there are air bubbles from the wood. So after 2 hours of the first layer drying, take 220 sandpaper and sand it down. You don’t need to sand down a lot, just sand with the grain once over. This allows the next layer of polyurethane to get a good grip on the first layer.
Apply the second coat and leave to dry for 24 hours. The can may recommend doing 3 layers, but unless you really want to, it’s not necessary.
4) I’d let it take an extra day to dry just for good measure before bringing it into the house.
During my process of learning how to restain furniture, I’ve learned that an extra day is always needed. A huge part depends on the temperature. Where I live, there’s rarely a good 75 degree day as recommended on the can. It’s either super cold or ridiculously hot and humid. So taking an extra day is a good idea.
5) Spice it up even more by adding charming new knobs!
Adding new knobs is a great way to pop your piece of furniture, giving it that extra charm. Hobby Lobby is a great place to go for different knobs. They have all sorts of colors, styles, and material. Otherwise, any hardware store will have normal styled knobs.
How does restaining (and restoring) a piece of furniture relate to being a Proverbs 31 woman?
I wish I could’ve shown you the color of the nightstand before I restained it. It was this awful orange tinted brown kind of color. Definitely wouldn’t have been my first choice of stain. But I’d had this nightstand for as long as I can remember. I wanted to appreciate this piece of furniture God has given us, but I always had it tucked away in a back room where nobody would see it.
But how does restaining and restoring an old piece of furniture relate to being a Proverbs 31 woman? Wouldn’t it be better to give it to someone who will appreciate it? In some cases, it might be the better option.
So where’s the link?
Remember in Proverbs 31:16, where the woman is considering a field and then buys it? What is she doing to the land after purchasing it? She’s restoring it to bring forth fruit. She’s planting the field, putting it to its intended use.
Think of restaining and restoring your furniture like this. I had two options for my nightstand: get rid of it or put it to its intended use. Because I had the ability, the know how, and the option to restain and restore it, I chose to do so! God gave me this nightstand. And while some pieces of furniture are beyond repair or have fulfilled its purpose, some pieces (like my nightstand) are still completely and totally usable. God wants us to be thankful for everything in our life, including the things we may not find joy in. But if there is something you can do to bring that joy back, why not try it?
Do you have a piece of furniture that is in desperate need of a new color? Are you struggling to find joy with what God has given you? I encourage you to do as the Proverbs 31 woman did and restore it for its intended use. Take the time and do the work to restain and restore your piece of furniture. (Plus, it’s a wise choice financially). My nightstand that was once tucked away in a backroom out of embarrassment, rarely being used, is now a piece that is used often and seen often.
_____________
Learning how to restain furniture really is easier than you might think. And it’s a whole lot cheaper than going out and buying something new. It will take time to dry, but the time you physically spend on it is about as long as you’ll spend shopping for something new. And after all is said and done, you’ll have a newfound love for the piece of furniture God gave you:)
For your convenience, I’ve created a free download for you to help you through each step! It’s a great way to be quickly reminded of what you need to do (and how easy it is!).
Comment below your before and after pictures! I’d love to see them! And as always, feel free to share this with others.

March 8, 2024
Spott on with this write-up, I actually believe this website needs far more attention. I’ll probably be returning to read more, thanks
for the info!
Also visit myy web-site; Doris